SpeedCalc for Atari ; Copyright (C) COMPUTE! and Kevin Martin & Charles Brannon, Program Editor#
 |
Introduction#
In response to popular request, COMPUTE! presents this professional-quality spreadsheet program for Atari 400, 800, XL, and XE computers with at least 48K RAM. Written completely in high-speed machine language, Atari SpeedCalc has all the important features you'd expect from a commercial spreadsheet program. In addition, its data files can be merged into text files created with the Atari SpeedScript word processor published last year in COMPUTE!. Atari SpeedCalc requires a disk drive, and a printer is optional but recommended. Have you ever planned a budget for your home or office? If so, you probably used some sort of worksheet divided into rows and columns. Perhaps you wrote the months of the year along the top of the sheet and listed categories for earnings and expenses along one side. After entering data for each category and month of the year, you could calculate total income figures by adding or subtracting numbers in each of the sheet's "cells." That's a classic example of a worksheet. It lets you enter and organize data, then perform calculations that produce new information. A spreadsheet program is an electronic version of the familiar paper worksheet. Since it does all the calculations for you at lightning speed, an electronic spreadsheet is far more convenient than its paper counterpart. And spreadsheet programs also offer editing features that let you enter and manipulate large amounts of data with a minimum of effort. Atari SpeedCalc is an all machine language spreadsheet program for Atari 400, 800, XL, and XE computers with at least 48K RAM. Though relatively compact in size, SpeedCalc is fast, easy to use, and has many of the features found in commercial spreadsheet programs. Even better, if you print a SpeedCalc file to disk (see below), you can then merge it with a word processing document created with SpeedScript, COMPUTE!'s popular word processor (see COMPUTE!, May 1985, or SpeedScript: The Word Processor for Atari Computers, published by COMPUTE! Books). Working together, SpeedCalc and SpeedScript make a powerful team. You can merge a chart of sales figures into a company report, create a table of scientific data for a term paper, and manipulate numeric information in many other ways. In a sense, a sprendsheet program brings to arithmetic all of the flexibility and power that a word processor brings to writing.Preparing The Program#
Although Atari SpeedCalc is small in comparison to similar commercial programs, it is one of the longest programs COMPUTE! has ever published. Fortunately, the "Atari MLX" machine language entry utility makes it easier to type a program of this size. Be sure to carefully read the Atari MLX article elsewhere in this issue before you begin. Here are the addresses you need to enter SpeedCalc with Atari MLX: SSttaarrttiinngg aaddddrreessss:: 88119922 EEnnddiinngg aaddddrreessss:: 1166881133 RRuunn//IInniitt AAddddrreessss:: 88119922 Next you'll be asked "Tape or Disk." SpeedCalc requires a disk drive, so type D. MLX will ask "Boot Disk or Binary File." Press F to select the Binary File option. (Although you could save SpeedCalc as a boot disk, it makes no sense, since such a disk cannot contain DOS, and DOS is necessary for file-oriented disk access.) The screen then shows the first prompt, the number 8192 followed by a colon. Type in each three-digit number shown in the listing. You do not need to type the comma shown in the listing. MLX inserts the comma automatically. The last number you enter in each line is a checksum. It represents the values of the other numbers in the line summed together. If you type the line correctly, the checksum calculated by MLX and displayed on the screen should match the checksum number in the listing. If it doesn't match, you have to retype the line. MLX is not fool-proof, though. It's possible to fool the checksum by exchanging the position of the three-digit numbers. Also, an error in one number can be offset by an error in another. MLX will help catch your errors, but you still must be careful. If you want to stop typing at some point and pick up later, press CTRL-S and follow the screen prompts. MLX will ask you for a disk filename; use any legal Atari filename except AUTORUN.SYS. Remember to note the line number of the last line you entered. When you are ready to continue typing, load MLX, answer the prompts as you did before, then press CTRL-L. For a binary disk file, MLX asks for the filename you gave to the partially typed listing. After the LOAD is complete, press CTRL-N and tell MLX the line number where you stopped. Now continue typing as before.
Saving The Finished Program#
When you finish all typing, MLX automatically prompts you to save SpeedCalc. For disks with Atari DOS 2.0, 2.5, or 3.0, save the completed program with the filename AUTORUN.SYS. This allows SpeedCalc to load and run automatically when you boot the disk. Because SpeedCalc requires a full 48K of RAM in order to work, you must always disable BASIC before loading or running SpeedCalc. On an Atari 400, 800, or 1200XL, unplug the BASIC cartridge (or any other cartridge, for that matter). On an Atari 600XL, 800XL, or 130XE, unplug any cartridges and disable BASIC by holding down the OPTION button when you first switch on and boot the computer. If you forget to disable BASIC, SpeedCalc won't work correctly. To use SpeedCalc with an Atari DOS disk, you must save or copy it on a disk that also contains DOS.SYS and DUP.SYS. Since you've saved SpeedCalc as AUTORUN.SYS, it will automatically load and run when you turn on your computer with this disk in the drive. SpeedCalc should always be named AUTORUN.SYS in order to load properly with Atari DOS. If you want to prevent it from automatically running for some reason, you can save it with another name, then rename it AUTORUN.SYS later. If you're using Optimized System Software's OS/A+ DOS or a compatible successor, you can give SpeedCalc any filename you like. Just use the LOAD command from DOS, and SpeedCalc will automatically run. Or you can give it a filename with the extension .COM, such as CALC.COM. Then you can start up by just typing CALC at the DOS prompt. You can also write a simple batch file to boot up SpeedCalc automatically. Some enhanced DOS packages may use so much memory that they conflict with SpeedCalc. In this case, you'll need to use Atari DOS instead on your SpeedCalc disks.Note#
The AUTORUN.SYS file on your DOS master disk is responsible for booting up the 850 Interface Module for RS- 232 communications. There is no easy way to combine the 850 boot program with SpeedCalc, so you can't access the R: device while using this program. If you need to send a SpeedCalc file to a serial printer or modem, print it to disk as explained below, then print or transmit the file data as you would any ATASCII text.The Atari SpeedCalc Screen#
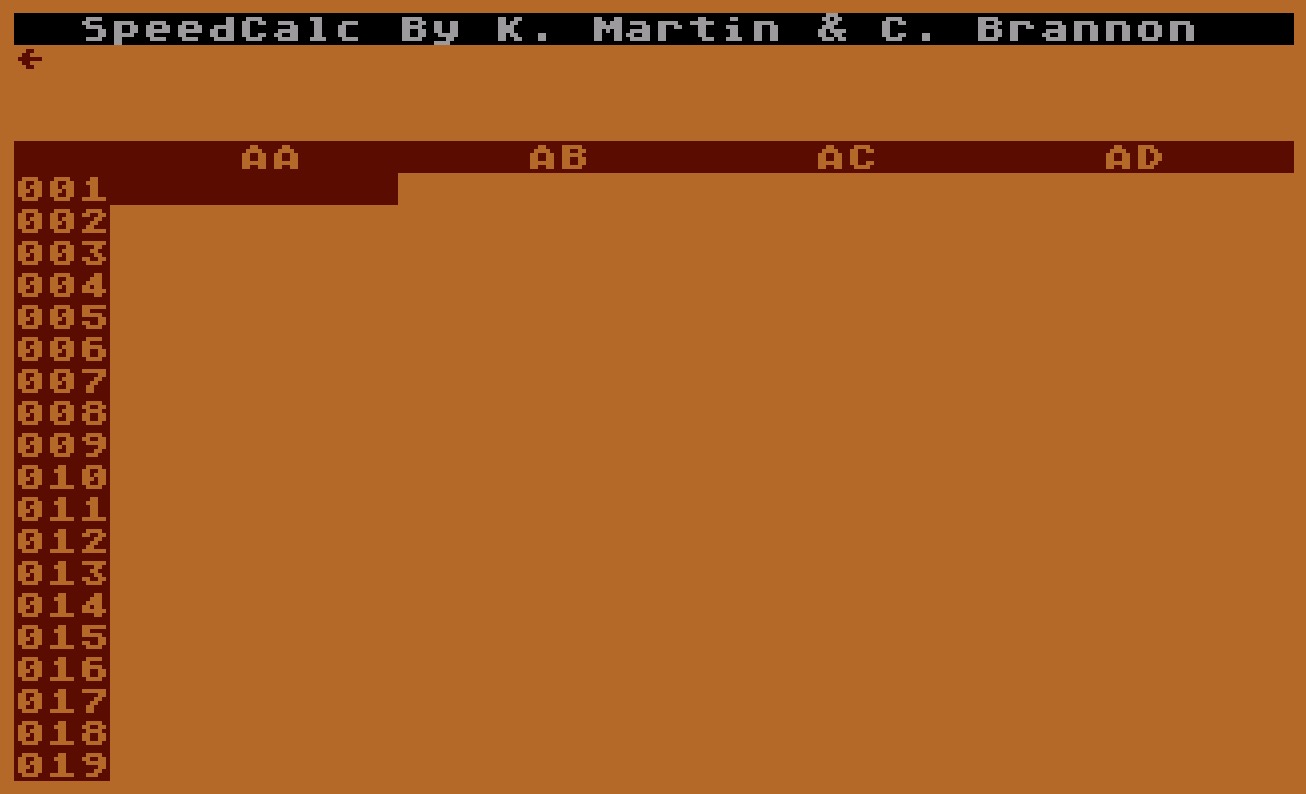
SpeedCalc uses the top line of the screen as the command line. This is where SpeedCalc displays messages and asks you questions. Screen lines 2–4 are the input buffer area. This is the work area where you enter and edit data. As you'll see in a moment, the input buffer also displays the data contained in the current cell. The work area cursor is a left arrow symbol (!). After you begin to enter data, most SpeedCalc commands (except for the cursor movement keys) are deactivated until you press RETURN to enter the data into the worksheet. The lower 19 screen lines are your window into the spreadsheet. Though the spreadsheet contains many rows and columns, only a few can fit on the screen at one time. By scrolling the screen back and forth with the cursor, you can move the display window to any part of the spreadsheet. The SpeedCalc worksheet consists of 50 vertical columns labeled with letters (AA, AB … BX) and 100 horizontal rows numbered from 1–100. The rectangle where a row and column intersect is called a cell. Cells are where you store data. With 50 columns and 100 rows, the SpeedCalc spreadsheet has a maximum of 5,000 (50*100) cells. Due to memory limitations, however, only about a third of these can actually contain data. But you may spread out the data over all 5,000 cells if necessary, depending on the format you need.Moving The Cursor#
Each cell is identified with the letters of its column and the number of its row. For example, the cell at the extreme upper-left corner of the sheet is called AA1, since it's in column AA and row 1. The cell below that is AA2. Moving one cell to the right from AA2 puts you in cell AB2, and so on. Your current position in the spreadsheet is shown by the highlighted cursor. The simplest way to move around the sheet is with the cursor keys, which work just as they do when you're writing or editing a BASIC program. Press CTRL and the right cursor key to move right, and so on. Another way to move the cursor is with CTRL-H. Press CTRL-H once to "home" the cursor on the current screen: The cursor moves to the upper-left cell. Press CTRL-H twice in succession to move the cursor to cell AA1, the home position for the entire sheet. SpeedCalc also has a goto command for moving the cursor over long distances. When you press CTRL-G, the command line displays GOTO: followed by a cursor. The cursor generally indicates that SpeedCalc is waiting for data —in this case it expects the name of the cell where you wish to go. If you enter BA88 at this point, SpeedCalc moves the cursor to the cell at column BA in row 88, adjusting the screen window as needed. Take a few moments to practice moving around the spreadsheet with all three methods; you'll be using them a lot. In a later section, we'll discuss how to change the size and format of a cell.Keyboard Commands#
SpeedCalc offers many different commands, a few of which are entered by pressing one key. However, most commands are entered by pressing CTRL along with another key. CTRL-G, as you've seen, is the goto command. CTRL-A displays the amount of free memory available, and so on. The most drastic command is CTRL-X, which exits SpeedCalc and returns to DOS. Since this effectively erases all data in memory, SpeedCalc prompts you with ARE YOU SURE Y/N? before it shuts down. To cancel the command, simply type N (or any key other than Y). If your Atari DOS 2.0/2.5 disk contains the file MEM.SAV (created with the CREATE MEM.SAV option on the DOS menu), you can exit to DOS and then return to SpeedCalc—however, all spreadsheet data will be lost. To restart SpeedCalc from the DOS menu after exiting, select menu option M (Run At Address), then enter the address 2000. If you're using OS/A+ or DOS XL, use RUN 2000 instead. If you press SYSTEM RESET in SpeedCalc, you'll see the message SYSTEM RESET TRAPPED. No spreadsheet data is lost. If you're using OS/A+ or DOS XL, type RUN 2000 to return to SpeedCalc....
Enhancements for Atari SpeedCalc#
Fred ChapmanHere are two enhancements for the Atari version of COMPUTE!'s popular spreadsheet program SpeedCalc (published March 1986). These new features give you greater control over printed output and allow you to copy or move blocks of cells without recalculating the entire spreadsheet. A disk drive is required.
Atari SpeedCalc is an excellent spreadsheet program, but even a good program can be improved here and there. "Enhancements For Atari SpeedCalc" makes several modifications to SpeedCalc to increase its power and convenience. Type in the program and save it to disk or tape, then run it.
When the program begins, you are prompted to insert a disk containing Atari SpeedCalc. Make sure you have a backup copy of SpeedCalc stored safely on another disk, in case you experience a disk error or change your mind about using the enhanced version of SpeedCalc. Press RETURN when the disk is in place. The enhancement program automatically appends the necessary code to the SpeedCalc AUTORUN. SYS file. After a few moments, the computer prints DONE. To enter SpeedCalc, remove or disable BASIC, then reboot the system. Selective Printing
When printing to a device (a printer, disk drive, or the screen), the original SpeedCalc always starts printing at the upper left cell in the spreadsheet (cell AA1). This feature effectively limits the width of any printout to seven- or eight-cell columns on an 80-column printer. The enhanced version of SpeedCalc has the ability to send the contents of any block of cells to the device you select.
To print out a selected block of cells, move the cursor to the bottom right cell of the block that you want to print, then press CTRL-P (hold down CTRL, then press P). When prompted for the output device, enter P: to select the printer, E: to select the screen, or D: followed by a filename to print to a disk file. Now move the cursor to the top left cell of the block you wish to print, then press RETURN. SpeedCalc prints only the selected block. Improved Move And Copy
The new version of SpeedCalc also has the ability to copy or move blocks of cells without recalculating. This permits you to piece together sections of the spreadsheet for printing without causing calculation errors. For example, you may want to move a column of titles just to the left of the cells to be printed. Recalculation during copy and move operations is now consistent with SpeedCalc's automatic recalculation mode. If automatic recalculation is turned on, copy and move commands cause the entire spreadsheet to be recalculated. If automatic recalculation is turned off, copy and move simply move the contents of the selected block from one place to another within the sheet. Just as in the original version, you can toggle automatic recalculation mode on or off by pressing CTRL-R. Enhancements For Atari SpeedCalc
For instructions on entering this listing, please refer to "COMPUTE!'s Guide to Typing in Programs" in this issue of COMPUTE!.
NM 10 REM PRINT ROUTINE ENHANCEMENTS FOR SPEEDCALC BI 20 REM THIS PROGRAM APPENDS SEVERAL PATCHES TO THE ORIGINAL SPEEDCALC DB 30 TRAP 430 NI 40 CHECKSUM=0:NBYTES=80 JL 50 FOR BYTE=1 TO NBYTES:READ ABYTE:CHECKSUM=CHECKSUM+ABYTE:NEXT BYTE OJ 60 IF CHECKSUM<>7369 THEN PRINT "ERROR IN DATA STATEMENTS":GOTO 440 CI 70 DIM A$(1) PM 80 PRINT "{CLEAR}INSERT SPEEDCALC DISK & PRESS RETURN":INPUT A$ DD 90 CLOSE #1 ID 100 OPEN #1,9,0,"D:AUTORUN.SYS":REM APPEND PATCHES TO END OF ORIGINAL FILE EO 110 RESTORE 170 BC 120 PRINT "WRITING..." DF 130 FOR BYTE=1 TO NBYTES:READ ABYTE:PUT #1,ABYTE:NEXT BYTE FP 140 CLOSE #1 JO 150 PRINT "DONE":END CG 160 REM $1F00-$1F2B, 1ST PATCH HC 170 DATA 0,31 KK 180 DATA 43,31 DD 190 DATA 162,0,32,199,58,32 GI 200 DATA 88,46,173,17,66,205 CB 210 DATA 1,66,144,240,173,1 JF 220 DATA 66,133,205,173,19,66 JE 230 DATA 205,2,66,144,227,169 CM 240 DATA 65,160,79,162,0,32 HC 250 DATA 199,58,32,89,33,162 IB 260 DATA 4,96 HN 270 REM BK 280 REM $1F40-$1F4A, 2ND PATCH KP 290 DATA 64,31 KI 300 DATA 74,31 MC 310 DATA 173,143,62,240,3 FP 320 DATA 76,150,51,76,152,33 HK 330 REM CH 340 REM $2CDB-$2CE0,REPL 6 BYTES IN SPEEDCALC CODE OC 350 DATA 219,44 NP 360 DATA 224,44 PO 370 DATA 32,0,31,32,199,58 HP 380 REM PL 390 REM $31C9-$31CB,COPY/MOVE PATCH NK 400 DATA 201,49 NN 410 DATA 203,49 ED 420 DATA 76,64,31 LI 430 ERR=PEEK(195):PRINT "ERROR- ";ERR KD 440 PRINT "PROGRAM ABORTED!" GD 450 CLOSE #1
SpeedCalc Keyboard Reference#
A few commands require you to press three keys at once. This sounds more awkward than it is in practice, since two of the three keys are OPTION and CTRL. For instance, the relative copy command is performed by pressing OPTIONCTRL- C (hold down the OPTION console key and CTRL, then press C). The table lists all the SpeedCalc commands, and the figure shows the keyboard layout with a description of what each key does. We'll be discussing each command in more detail below.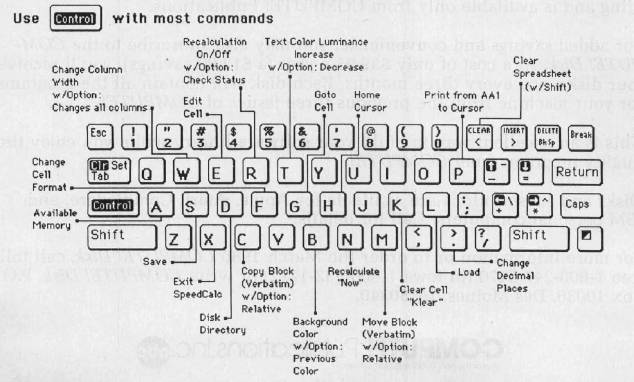 |
...
ATR Images#

XEX files#
Manuals#
Reference#

Images#
 |
 |